Friday, June 28, 2013

Traveling? 10 tips to protect your laptop from theft

Copy from Microsoft at Work website (retired June 30, 2013), copyright Microsoft.

Traveling? 10 tips to protect your laptop from theft

These days, it seems that just about everybody uses a laptop or notebook computer to get work done away from the office or on the road. Unfortunately, the pervasiveness of laptop computing has made portable systems an easy target for theft. If your laptop computer is stolen, or if someone gains access to your files while your back is turned, your company information—not to mention your personal and financial data—can be exposed.
Looking for information about security features you can use on your laptop to keep your data safe while you travel? This article covers some of the most pertinent. If you’d like more general security suggestions (whether on the road or at the office), check out 10 ways to work more securely.
Use these 10 tips to learn how you can help protect your laptop from theft when you're on the road.

1. Avoid using computer bags

Computer bags can make it obvious that you're carrying a laptop. Instead, try toting your laptop in something more common, like a padded briefcase or suitcase.

2. Use strong passwords, and do not keep them in your laptop bag

Strong passwords that are difficult to break or guess can thwart unauthorized access to individual files and even to the entire operating system. Learn how to create strong passwords:
You can also check the strength of your password by typing it into a password checker like this free one offered by Microsoft Security.
Learn how to password-protect your files:
Of course, the strongest password in the world won’t help if you give it away to a thief. Keeping your password with your laptop is like leaving your keys in the car. Without your password or important access numbers, it will be more difficult for a thief to access your personal and corporate information.

3. Encrypt your data

If someone should get your laptop and gain access to your files, encryption can give you another layer of protection. With the Windows operating system, you can choose to encrypt files and folders. Then, even if someone gains access to an important file, they can't decrypt it and see your information. Learn more about how to encrypt your data:

4. Use a screen guard

These guards help prevent someone from seeing your screen—even if he or she peeks over your shoulder. They can be very useful if you need to work on sensitive information in a public place, and they are especially helpful when you're traveling or need to work in a crowded area. The screen guard from Secure-It is just one example of a screen guard you could use.

5. Carry your laptop with you

Always take your laptop on the plane or train rather than checking it with your luggage. It's easy to lose luggage and it's just as easy to lose your laptop. If you're traveling by car, keep your laptop out of sight. For example, lock it in the trunk when you're not using it.

6. Keep your eye on your laptop

When you go through airport security, don't lose sight of your bag. Hold your bag until the person in front of you has gone through the screening process. Many bags look alike, and yours can easily be lost in the shuffle.

7. Avoid setting your laptop on the floor

Putting your laptop on the floor is an easy way to forget or lose track of it as you talk at a ticket counter or order your latte. If you have to set it down, try to place it between your feet or leaning against your leg, so you're always aware of it.

8. Buy a laptop security device or program

If you need to leave your laptop in a room or at your desk, use a laptop security cable to securely attach it to a heavy chair, table, or desk. The cable makes it more difficult for someone to take your laptop. There are also programs and devices that will report the location of a stolen laptop. These work when the laptop connects to the Internet and can report the laptop's exact physical location. Absolute Software’s LoJack and its line of Computrace products, for example, offer physical location tracing in addition to capabilities for remotely disabling a missing computer, retrieving or deleting data, and more. Search for more computer tracking and recovery solutions.

9. Try not to leave your laptop in your hotel room

Too many things have been lost in hotel rooms. These rooms may not be completely secure. If you must leave your laptop in your room, put the "Do not disturb" sign on the door to keep hotel staff out. Don’t leave your laptop at the front desk, either.

10. Affix your name and contact info to the laptop

Security experts advise that you affix your name and contact information, along with a promise of a "Reward if lost or stolen—no questions asked,” on the computer. These can help improve your odds of getting the computer back in the event of theft or a simple mix-up.


What to do if your laptop is stolen

  • Change your network password to help secure access to corporate servers.
  • Report the theft to local authorities (such as the police) and to your company's IT department.
  • If customer data was on the laptop, contact your account representative, legal representative, or appropriate person at your company so they can take the necessary actions.

Top of page

Wi-Fi: 8 tips for working securely from wireless hot spots

Copy from retired Microsoft at Work (retired 30 June 2013), copyright Microsoft.

Wi-Fi: 8 tips for working securely from wireless hot spots

Wireless (also known as Wi-Fi) hot spots, are changing the way people work. These wireless local area networks (WLANs) provide high-speed Internet connections in public locations (and at home). You can access them with a wireless-ready mobile PC, such as a laptop, netbook, smartphone, or any other mobile device equipped with a wireless card.
Hot spots range from paid services, such as T-Mobile or Verizon Wireless, to free, public connections. Hot spots are everywhere, including coffee shops, restaurants, libraries, bookstores, airports, trains, and hotel lobbies.
Many of these places will inform you that they have a hot spot for wireless Internet use and will tell you how to access it, including providing you with a password, if necessary. You can also use a directory to find a hot spot near you.

Are Wi-Fi hot spots safe?

Public hot spots all have one thing in common—they are open networks that are vulnerable to security breaches. Because they do not encrypt data, your passwords, email messages, and other information can be visible to hackers. That means it's up to you to be aware of wireless hot spot security and to protect the data on your PC or mobile device. In this article, we cover a few Internet security tips to make working on wireless networks in public locations more secure.

1. Disable your Wi-Fi adapter

When you’re not at home or at work, it’s a good idea to turn off your laptop or notebook’s Wi-Fi capability when you’re not using it. Otherwise your computer might connect to a malicious hot spot without your realizing it. Many laptops now have a Wi-Fi hardware button you can use to disable your Wi-Fi adapter. If yours doesn’t, you can disable your Wi-Fi adapter using your operating system.

Windows 7


  1. Click Start, click Control Panel, and then click Hardware and Sound.
  2. Under Devices and Printers, click Device Manager.
  3. In the list, click Network adapters. Right-click your wireless card, and then click Disable.
  4. Follow the same steps to enable the adapter.

Windows Vista


  1. Click Start, click Control Panel, and then click System and Maintenance.
  2. In the System and Maintenance window, click the Device Manager icon.
  3. In the list, click Network adapters. Right-click your wireless card, and then click Disable.
  4. Follow the same steps to enable the adapter.

Windows XP


  1. In the system tray, click the wireless network icon, and then select Disable. This removes the icon.
  2. To restore the icon and enable your wireless connection, click Start, click Control Panel, and then click Network and Internet Connections.
  3. Under the Pick a Control Panel icon, click Network Connections, and then double-click your wireless connection.


2. Try to choose more secure connections

Use a virtual private network (VPN)

It's not always possible to choose your connection type, but Internet security is critical. When you can, opt for wireless networks that require a network security key or have some other form of security, such as a certificate. The information sent over these networks is encrypted, and encryption can help protect your computer from unauthorized access. For example, instead of using a public hot spot with no encryption, use a virtual private network (VPN). If your business does not have its own VPN, you can download and install free VPN software. The security features of the different available networks appear along with the network name as your PC discovers them.

Protect your email with https

One way to protect your email messages in public is to select the https or other secure connection option in your email account settings (if your email provider supplies one). This option may be called always use https, more secure connection, or something similar. Even if the email provider you use has a secure network, after you log on to your account on a public network, your information is no longer encrypted unless you use a more secure connection. An https connection, for example, which includes encryption, is more secure than an http connection

3. Make sure your firewall is activated

A firewall helps protect your PC by preventing unauthorized users from gaining access to your computer through the Internet or a network. It acts as a barrier that checks all incoming information and then either blocks the information or allows it to come through. All Windows operating systems come with a firewall, and you can make sure it's turned on.
Note: Some antivirus software includes its own firewall. If your antivirus has a firewall and it is turned on, you do not need to turn on Windows Firewall. Having two firewalls turned on is not recommended.

Turn Windows Firewall on:


  1. Click Start, and then click Control Panel.
  2. In Control Panel, click Network and Internet Connections.
  3. In the Network and Internet Connections window, under Pick a task, click Change Windows Firewall settings.
  4. In the Windows Firewall dialog box, on the General tab, select On.


4. Monitor your access points

Chances are that there are multiple wireless networks anywhere you're trying to connect. These connections are all access points, because they link into the wired system that gives you Internet access. So how do you make sure you're connecting to the right one? Simple—by configuring your PC to let you approve access points before you connect.

Configure access points


Windows 7


Windows 7 takes the guesswork out of connecting to hot spots because it automatically prompts you to approve new connections. In addition, after you approve a connection, you can assign it a profile for future use.

Windows Vista


Windows Vista takes the guesswork out of connecting to hot spots because it automatically prompts you to approve new connections. In addition, after you approve a connection, you can assign it a profile for future use.

Windows XP


  1. Click Start, click Control Panel, and then click Network and Internet Connections.
  2. Under the Pick a Control Panel icon, click Network Connection.
  3. Right-click Wireless Network Connection, and then click Properties.
  4. On the Wireless Networks tab, make sure that the Use Windows to configure my wireless network settings check box is selected.
  5. Under Preferred networks, make sure that the name of the network that you want to connect to is highlighted, and then click Advanced.
  6. Click Access point (infrastructure) network only, and then click Close.

5. Disable file and printer sharing

File and printer sharing is a feature that enables other computers on a network to access resources on your computer. When you are using your mobile PC in a hot spot, it's best to disable file and printer sharing—when it's enabled, it leaves your computer vulnerable to hackers. Remember, though, to turn this feature back on when you return to the office.

Disable file and printer sharing


Windows 7


  1. Click Start, and then click Control Panel.
  2. Click Network and Internet, and then click Network and Sharing Center.
  3. Under Change your network settings, click Choose homegroup and sharing options.
  4. Under Other homegroup actions, click Change advanced sharing options.
  5. File and printer sharing, select Turn off file and printer sharing, and then click Save changes.

Windows Vista


  1. Click Start, and then click Control Panel.
  2. Click Network and Internet, and then click Network and Sharing Center.
  3. Under Sharing and Discovery, click the arrow next to File sharing, click Turn off file sharing, and then click Apply.
  4. Click the arrow next to Printer sharing, click Turn off printer sharing, and then click Apply.

Windows XP


  1. Click Start, and then click Control Panel.
  2. Click Security Center, and then click Windows Firewall.
  3. Click the Exceptions tab, and then, under Programs and Services, clear the File and Printer Sharing check box.

6. Make your folders private

When the folders on your mobile PC are private, it's more difficult for hackers to access your files.

Make a folder private


Windows 7


Windows 7 not only makes folders private by default but also requires passwords for shared or public folders. As a result, you're already covered! But if you want to double-check that a folder is not public, simply right-click the folder in question, and then click Share with to see whether it is private or public. If it is public, turn Public folder sharing off. Here’s how:
  1. Click the Start button Start button, and then click Control Panel. In the search box, type network, click Network and Sharing Center, and then, in the left pane, click Change advanced sharing settings.
  2. Click the chevron chevron button to expand your current network profile.
  3. Under Public folder sharing, click Turn off Public folder sharing (people logged on to this computer can still access these folders).
  4. Click Save changes. Administrator password If you're prompted for an administrator password or confirmation, type the password or provide confirmation.

Windows Vista


Windows Vista not only makes folders private by default but also requires passwords for shared folders. As a result, you're already covered! But if you want to double-check, simply right-click the folder in question and select Properties. On the Security tab, you can review the set permissions.

Windows XP


  1. Click Start, and then click My Computer.
  2. Click the drive where Windows is installed, and then click Documents and Settings.
  3. Open your user folder, right-click the folder that you want to make private, and then click Properties.
  4. On the Sharing tab, click Do not share this folder, and then click OK.
Repeat the steps above for each folder that you want to make private.

7. Encrypt your files

You can protect your files further by encrypting them, which requires a password to open or modify them. Because you must perform this procedure on one file at a time, consider password-protecting only the files that you plan to use while working in a public place.

Encrypt folders or files


8. Consider removing sensitive data from your portable computer

If you're working with extremely sensitive data, it might be worth taking it off your portable computer altogether. Instead, save it on a corporate network share or on a password-protected site, such as Windows Live SkyDrive, and access it only when necessary. This way, you have multiple safeguards in place.

A few simple precautions can help make working in public places more secure. By selecting the best wireless Internet connections and adjusting settings, you can enjoy more productive and safer work sessions—no matter where you are.

5 steps: How to set up your home wireless network

Copy from retired Microsoft at Home (retired June 30, 3013), copyright Microsoft.

5 steps: How to set up your home wireless network

You can use a wireless network (WLAN) to share Internet access, files, printers, game consoles, and other devices among all the computers in your home. After you’ve completed the initial wireless router setup and added your computers and devices to the network, you can use your home network to surf the web or to play online games—whether you're sitting in your living room or relaxing in your backyard.
It's easier than ever to set up a wireless network, especially now that Internet access and routers (like Linksys wireless routers and D-link wireless routers) have become widely available.
Man with a laptop in a hammock

What you’ll need to set up your wireless network

  • An operating system that supports wireless networking
    The Windows 7 operating system fully supports wireless networking. For Windows Vista users, we recommend installing Windows Vista Service Pack 2 before setting up your wireless network. For Windows XP users, we recommend installing Windows XP Service Pack 3. Use Windows Update to check whether you need the service pack and to install it. Click the Start button, click All Programs, click Windows Update, and then click Check for updates. Although the service packs for Windows Vista and Windows XP are not required for wireless networking, they can make things much easier and can help protect you against hackers, worms, and other Internet intruders.
  • A broadband (DSL or cable) Internet connection
    To set up a wireless network, you need a broadband or high-speed Internet connection (not a dial-up connection) provided by an Internet service provider (ISP), usually for a monthly fee. Two common broadband technologies are Digital Subscriber Line (DSL) and cable technology. These require a DSL modem or a cable modem (often provided by your ISP). After you have an ISP and a modem, you're ready to connect to the Internet.

    Set up a new connection to the Internet:
  • A wireless router, a DSL modem, or a cable modem with built-in wireless networking support
    The router converts the signals coming across your Internet connection into a wireless broadcast, sort of like a cordless phone base station. Newer DSL and cable modems come with integrated wireless networking capability and are called modem routers. If the modem router you received or purchased from your ISP already has wireless capability built in, you do not need to purchase a separate wireless router. Just follow the instructions provided by your ISP for activating your wireless connection.

    If you do need to purchase a wireless router, be sure that you buy a wireless router and not a wireless access point. The Linksys router is a popular router for wireless networks because it’s simple to set up. There are many routers to choose from, for example:


    Picture of a Linksys wireless routerPicture of a D-Link wireless routerPicture of a Cisco wireless routerPicture of an ASUS wireless router
    Linksys wireless routersD-Link wireless routersCisco wireless routersASUS wireless routers
    While you're looking for a wireless router or other wireless equipment in stores or on the Internet, you might notice that you can choose equipment that supports four different wireless networking technologies: 802.11a, 802.11b, 802.11g, and 802.11n. We recommend 802.11g (Wireless-G) or 802.11n (Wireless-N) because they offer excellent performance and are compatible with almost everything.

    NOTE: If you do not want to buy a wireless router or if you want to connect computers or devices temporarily for a specific purpose, like sharing devices or games, you can set up a temporary wireless network without a router. This is called an ad hoc network.

    Set up an ad hoc network:
  • A computer with built-in wireless networking support or a wireless network adapter
    If you have a newer computer, you may already have built-in wireless capabilities. If this is the case, you don’t need a wireless network adapter. Here’s how to check whether your computer has wireless support installed:

    Windows 7 and Windows Vista


    Windows XP


    If your desktop or laptop computer does not have built-in wireless support, you need to purchase a network adapter to wirelessly connect your computer to your wireless router. If you need an adapter for a desktop computer, buy a USB wireless network adapter. If you have a laptop, buy a PC card-based network adapter. Make sure that you have one adapter for every computer on your network.

    NOTE: To make setup easy, choose a network adapter made by the same vendor that made your wireless router. For example, if you find a good price on a Linksys router, choose a Linksys network adapter to go with it. To make shopping even easier, buy a bundle, such as those available from Linksys, Actiontec, D-Link, Netgear, Microsoft, and Buffalo. If you have a desktop computer, make sure that you have an available USB port where you can plug in the wireless network adapter. If you don't have any open USB ports, buy a USB hub to add additional ports.
  • A copy of your router setup instructions
    Before you begin setting up your wireless network, it’s a good idea to make sure that you have the copy of the setup instructions provided by the router manufacturer or your ISP. If you do not have a copy, visit the manufacturer’s website for get instructions on how to set up your router. All routers vary, and you may need to consult the instructions to set up your wireless network using your specific router.
Shopping list
After you have everything you need, follow these five steps to set up your wireless network.

1. Connect to the Internet

Make sure that your Internet connection and your DSL or cable modem are working. Your wireless network depends on this connection.

2. Connect your wireless router

These are the steps for connecting a stand-alone wireless router to your DSL modem or cable modem. If you have a modem router, follow your ISP’s instructions for connecting your network.
Since you'll be temporarily disconnected from the Internet, print these instructions before you go any further.
First, locate your cable modem or DSL modem and unplug it to turn it off.
Next, connect your wireless router to your modem. Your modem should stay connected directly to the Internet. Later, after you've hooked everything up, your computer will wirelessly connect to your router, and the router will send communications through your modem to the Internet.
Wireless router setup mapNext, connect your router to your modem:
Note: The instructions below apply to a Linksys wireless router. The ports on your router may be labeled differently, and the images may look different on your router. Check the documentation that came with your equipment for additional assistance. Or do a Bing search on “[your manufacturer/model] wireless router setup” to find images and instructions.
  • If you currently have your computer connected directly to your modem: Unplug the network cable from the back of your computer, and plug it into the port labeled Internet, WAN, or WLAN on the back of your router.
  • If you do not currently have a computer connected to the Internet: Plug one end of a network cable (included with your router) into your modem, and plug the other end of the network cable into the Internet, WAN, or WLAN port on your wireless router.
  • If you currently have your computer connected to a router: Unplug the network cable connected to the Internet, WAN, or WLAN port from your current router, and plug this end of the cable into the Internet, WAN, or WLAN port on your wireless router. Then, unplug any other network cables, and plug them into the available ports on your wireless router. You no longer need your original router, because your new wireless router replaces it.
Wireless modem lightsNext, plug in and turn on your cable or DSL modem. Wait a few minutes to give it time to connect to the Internet, and then plug in and turn on your wireless router. After a minute, the Internet, WAN, or WLAN light on your wireless router should light up, indicating that it has successfully connected to your modem.

3. Configure your wireless router

Wireless cablesUsing the network cable that came with your wireless router, you should temporarily connect your computer to one of the open network ports on your wireless router (any port that isn't labeled Internet, WAN, or WLAN). If you need to, turn your computer on. It should automatically connect to your router.
Next, open Internet Explorer and type in the URL or address to configure your router.
NOTE: Do this on the computer that you are using to set up your wireless network. The computer automatically links you to the router’s page. If you type the router’s URL on a different computer, typing the address in the navigation bar will not take you to your router’s configuration page.
On the router configuration page, you might be prompted for a password. The address and password you use varies depending on what type of router you have, so refer to the instructions included with your router or on the manufacturer’s website.
For quick reference, this table shows the default addresses, user names, and passwords for some common router manufacturers. If the address is not listed here, you can read the documentation that came with your router or go to the manufacturer's webpage to find it. There may be multiple website addresses you can use.
RouterAddressUsernamePassword
3Comhttp://192.168.1.1adminadmin
D-Linkhttp://192.168.0.1adminadmin
Linksyshttp://192.168.1.1adminadmin
Microsoft Broadbandhttp://192.168.2.1adminadmin
Netgearhttp://192.168.0.1adminpassword
Actiontechttp://192.168.0.1usernamepassword
Internet Explorer shows your router's configuration page, along with the modem IP address and other information. Most of the default settings should be fine, but you need to configure three things:
  • Your wireless network name, known as the SSID. This name identifies your network, and it appears in a list of available wireless networks. You should change the default SSID that your ISP provided and give your network a unique name that none of your neighbors are using. This helps you identify your network, and it can help keep your wireless network secure by preventing it from overlapping with other wireless networks that might be using the default SSID.
  • Wi-Fi Protected Access (WPA or WPA2), which can help protect your wireless network. It’s important to help secure your wireless network by setting up a network security key, which turns on encryption. With encryption, people can't connect to your network without the security key, and all information sent across your network is encrypted so that only computers with the key to decrypt the information can read it. This can help prevent attempts to access your network and files without your permission. Wi Fi Protected Access (WPA or WPA2) is the recommended wireless network encryption method. Wireless encryption (WEP) is not as secure. Windows 7, Windows Vista Service Pack 2, and Windows XP Service Pack 3 support WPA2.

    When you set up most routers (stand-alone routers and modem routers), you are asked to provide a pass phrase that the router uses to generate several keys. Make sure that your pass phrase is unique and long (you don't need to memorize it). Some routers and modem routers now come with a function called Quick Security Setup (or QSS) that automatically issues you a key when you press a button on the router.

    Be sure to keep a hard copy and a digital copy of your network security key and pass phrase, in case you lose or misplace them. You can recover a lost network key or reset it on your router, but these are complicated processes that are different for every router and they sometimes entail setting up your network again.
  • Your administrative password, which controls your wireless network. Just like any other password, it should not be a word that you can find in the dictionary, and it should be a combination of letters, numbers, and symbols. Be sure to save a hard copy and a digital copy of this password, too, because you'll need it if you ever have to change your router's settings.
The exact steps you follow to configure these settings will vary depending on the type of router you have. After each configuration setting, be sure to click Save Settings, Apply, or OK to save your changes.
Get more help making your network secure.
Now, before connecting your computers and devices to the network, you should disconnect the wireless network cable from your computer.

4. Connect your computers, printers, and other devices to the wireless network

You can connect multiple computers, printers, and many other peripheral devices, such as an Xbox, Xbox 360, TV, cell phone, iTouch, or iPad, to your network. Before you connect them to your network, make sure that the computer or device you want to add has built-in wireless networking or a network adapter. Many newer devices have built-in wireless capability. If the computer or device you want to add does not have built-in wireless network support, plug the network adapter into your USB port and place the antenna on top of your computer (in the case of a desktop computer) or insert the network adapter into an empty PC card slot (in the case of a laptop). Windows automatically detects the new adapter and may prompt you to insert the CD that came with your adapter. The on-screen instructions guide you through the configuration process.
Use the following links to find step-by-step instructions for adding your specific computer or device to your network using your operating system. There are instructions for each operating system, and they show you how to automatically or manually add wired (Ethernet) or wireless computers and how to add computers running Windows 7, Windows Vista, or Windows XP. There are also instructions for adding printers and both wired and wireless devices.

5. Share files, printers, and more

Now that your computers and devices are connected, you can begin sharing files, printers, games, and much more. One of the top reasons for setting up a home network is to share a printer. Another is to share files. The steps for doing this, however, aren’t always obvious, so here are instructions to get you started:

Share a printer
Share files
File and printer sharing: Frequently asked questions

Troubleshooting

After your wireless network is set up, Windows can help you troubleshoot network connection problems.
Get more help setting up, securing, and using a wireless network:

10 tips to help improve your wireless network

Copy from the retired "Microsoft at Home" website (retired 30June2013), copyright Microsoft.

10 tips to help improve your wireless network

If the Windows operating system ever notifies you about a weak Wi-Fi signal, it probably means that your connection isn't as fast or as reliable as it could be. Worse, you might lose your connection entirely in some parts of your home. If you want to boost the signal for your wireless network (WLAN), try some of these tips for extending your wireless range and improving your wireless network speed and performance.
Couple at a laptop reviewing wireless channels

1. Position your wireless router, modem router, or access point in a central location

When possible, place your wireless router, wireless modem router (a DSL or cable modem with a built-in wireless router), or wireless access point (WAP) in a central location in your home. If your wireless router, modem router, or access point is against an outside wall of your home, the signal will be weak on the other side of your home. If your router is on the first floor and your PC or laptop is on the second floor, place the router high on a shelf in the room where it is located. Don't worry if you can't move your wireless router, because there are many other ways to improve your connection.
Bad router and good router placement comparison

2. Move the router off the floor and away from walls and metal objects (such as metal file cabinets)

Metal objects, walls, and floors will interfere with your router's wireless signals. The closer your router is to these obstructions, the more severe the interference, and the weaker your connection will be.

3. Replace your router's antenna

The antennas supplied with your router are designed to be omnidirectional, meaning that they broadcast in all directions around the router. If your router is near an outside wall, half of the wireless signals will be sent outside your home, and much of your router's power will be wasted. Most routers don't allow you to increase the power output, but you can make better use of the power. If your router’s antenna is removable, you can upgrade to a high-gain antenna that focuses the wireless signals in only one direction. You can even aim the signal in the direction you need it most. Consider a Linksys high-gain antenna—they’re powerful and easy to install. Or shop for other high-gain antennas.
Standard antenna and high-gain antenna examples

4. Replace your laptop's wireless PC card-based network adapter

Laptops with built-in wireless networking capability typically have excellent antennas and don't need to have their network adapters upgraded. These tips are for laptops that do not have built-in wireless networking.
Wireless network signals must be sent both to and from your computer. Sometimes your router can broadcast strongly enough to reach your computer, but your computer can't send signals back to your router. To improve this, replace your laptop's PC card-based wireless network adapter with a USB wireless network adapter that uses an external antenna. In particular, consider a Linksys Wireless-N or Hawking Hi-Gain Wireless-N USB network adapter. These add an external, high-gain antenna to your computer and can significantly extend your wireless range.

Wireless router and wireless repeater

5. Add a wireless repeater

Wireless repeaters extend your wireless network range without requiring you to add any wiring. Just place the wireless repeater halfway between your wireless router, modem router, or access point and your computer, and you can get an instant boost to your wireless signal strength. Check out the wireless-N repeaters from Linksys, Hawking Hi-Gain, ViewSonic, D-Link, and Buffalo Technology, or shop for a wireless-N repeater.

Wireless channels

6. Change your wireless channel

Wireless routers can broadcast on several different channels, similar to the way radio stations use different channels. In the United States and Canada, these channels are 1, 6, and 11. Just as you'll sometimes hear interference on one radio station while another is perfectly clear, sometimes one wireless channel is clearer than others. Try changing your wireless router's channel through your router's configuration page to see if your signal strength improves. You don't need to change your computer's configuration, because it can automatically detect the new channel.
To find your router configuration page, consult this quick reference table, which shows the default addresses for common router manufacturers. If the address is not listed here, read the documentation that came with your router, or visit the manufacturer's webpage.
RouterAddress
3Comhttp://192.168.1.1
D-Linkhttp://192.168.0.1
Linksyshttp://192.168.1.1
Microsoft Broadbandhttp://192.168.2.1
Netgearhttp://192.168.0.1
Actiontechttp://192.168.0.1

7. Reduce wireless interference

The most common wireless technology, 802.11g (wireless-G), operates at a frequency of 2.4 gigahertz (GHz). Many cordless phones, microwave ovens, baby monitors, garage door openers, and other wireless electronics also use this frequency. If you use these wireless devices in your home, your computer might not be able to "hear" your router over the noise coming from them.
If your network uses wireless-G, you can quiet the noise by avoiding wireless electronics that use the 2.4 GHz frequency. Instead, look for cordless phones and other devices that use the 5.8 GHz or 900 megahertz (MHz) frequencies. Because 802.11n (wireless-N) operates at both 2.4 GHz and the less frequently used 5.0 GHz frequency, you may experience less interference on your network if you use this technology.

8. Update your firmware or your network adapter driver

Router manufacturers regularly make free improvements to their routers. Sometimes, these improvements increase performance. To get the latest firmware updates for your router, visit your router manufacturer's website.
Similarly, network adapter vendors occasionally update the software that Windows uses to communicate with your network adapter, known as the driver. These updates typically improve performance and reliability. To get the driver updates, follow the instructions for your operating system:

Windows XP


9. Pick equipment from a single vendor

Although a Linksys router will work with a D-Link network adapter, you often get better performance if you pick a router and network adapter from the same vendor. Some vendors offer a performance boost of up to twice the performance when you choose their hardware (like their USB wireless network adapters). Linksys has the SpeedBooster technology for its wireless-G devices, and D-Link has the 108G enhancement for its wireless-G devices. These enhancements can be helpful if you have wireless-G devices and you need to transmit over a long distance or you live in an older house (old walls tend to block the signal more than newly built ones do).
If speeding up your connection is important to you, consider the next tip—upgrading your wireless technology.

10. Upgrade 802.11a, 802.11b, and 802.11g devices to 802.11n

Although wireless-G (802.11g) may be the most common type of wireless network, wireless-N (802.11n) is at least twice as fast and it has better range and stability. Wireless-N is backward-compatible with 802.11a, 802.11b, and 802.11g, so you can still use any existing wireless equipment that you have—though you won’t see much improvement in performance until you upgrade your computer or network adapter to wireless-G, too.
If you're using wireless-B or wireless-G and you're unhappy with your network’s speed and performance, consider replacing your router and network adapters with wireless-N equipment. If you're buying new equipment, definitely choose wireless-N. Linksys Wireless-N routers, for example, are powerful, secure, and simple to set up. So are Linksys Wireless-N USB wireless network adapters.
Find out which wireless technology is installed on your computer:

Windows 7

Windows Vista


Wireless networks never reach the theoretical bandwidth limits. Wireless-B networks typically get 2–5 megabits per second (Mbps). Wireless-G networks are usually in the 13–23 Mbps range. The average everyday speed for wireless-N equipment is about 50 Mbps.
Don’t forget—the security of your wireless network is as important as its speed and performance. Learn about the different security methods.
Help make your network more secure:

Wednesday, April 3, 2013

Updating from Messenger to Skype

Creating Skype Account

1.


2. 


3. 


4. 


Updating Messenger to Skype


1.

2.

3. 


4.
 

5.


6.


7. 


8.


Monday, November 12, 2012

Clean Up Factory Bloatware

Tutorial Copy/Paste for Greg:

information   Information
Today's consumer PC's are loaded with pre-installed sponsors' bloatware programs and useless factory utilities which have better versions built into Windows 7. Bloatware can compromise the OS in many ways. Even uninstalling it can damage System files. These tips are based on helping countless users here to safely clean up OEM factory bloatware.

1. Type "msconfig" in Start Search box, rightclick result to Run As Administrator. Uncheck everything in msconfig>Startup except AV; MS listings for Gadgets, Stickies, Skydrive if you use them; and touchpad driver software if required to use certain features like scrolling. Illustrated steps here: Startup Programs - Change. The rest are freeloaders that slow startup, hog CPU/RAM, and can spy on you. Programs can wait to start until you run them.
● If you have a question about any listing, google it to find out what it does.

● Anything Google is spyware which will track you and paste interest ads. Use only the stable Google search box built into Browser and stay signed out of Google sites. You can greatly reduce internet tracking and spying by acting to Opt Out of Network Advertising.

● Turning off HP Wireless manager sometimes requires first ticking "Allow Independent Wireless" box in its Preferences to default to Windows 7's superior wireless manager.

2. After several reboots enter msconfig>Services, check box to "Hide all MS services" then again deselect items same as in #1. Check back repeatedly here and in Startup list to see if anything writes itself back in - if so turn it off in its Program Preferences or Uninstall it. You now have a Clean Boot!

3. Decide which programs you can do without over time then uninstall them in Control Panel>Programs and Features. To help decide, open each program and look at its features, google name to learn more. If in doubt keep the program until you can try it. Almost no OEM utilities are worth keeping except Camware if you use its features, battery or HD monitor if these work better for you than what's built into Windows 7.

4. Monitor whether bloatware uninstalls have corrupted System files by running SFC /SCANNOW Command - System File Checker. Irreparable system files resulting in Performance problems can sometimes be remedied without reinstall by a Repair Install.

5. Use a lightweight free AV like MS Security Essentials with the Windows Firewall to gain back performance from more bloated AV's, which should be uninstalled first without even starting them up if possible.

6. Install all of your Windows Updates which should be set to Automatic install, ticking box to Treat Recommended as Important. Check optional Windows Updates regularly for driver updates after enabling hardware auto-updating. You can trust all Updates given by Windows 7 as they rarely malfunction (one in a million), keep your drivers current, OS performance updated and Firewall security fortified.

7. Monitor Event Viewer>Administrative View to google repeat error text and ID# to find how others have resolved these. Type "event" in Start Search box.

8. Check also the Performance log on Advanced Tools page accessed by clicking WEI score link at Computer>Properties to google repeat errors. Look for cued issues at top of Tools page, Generate a System Health Report.

9. Type "Solutions" in Start Search box to see solutions to problems sent and not. Windows 7 is interactive this way so always send Problem Reports.


10. Clean and order the HD perfectly using free state-of-the-art CCleaner (using "Run Cleaner" and Registry tab at defaults) then free Puran boot-time defrag with Intelligent Optimizer enabled on the Additional Operations tab. Run these approx monthly, more often if 1gb+ crap is found. Periodically include Puran's full Disk Check option.

11. Save externally a Windows 7 backup image of your optimized Windows 7 which may become preferable to Factory Recovery and can re-image your HD or it's replacement in 20 minutes: Backup Complete Computer - Create an Image Backup ● System Image Recovery.

Keep your data backed up by dragging active User folders to external storage (easiest), syncing data to another internal backup HD using SyncToys, or use Skydrive to upload to the cloud 7gb free with each Windows Live ID, even Sync Any Folder to Your SkyDrive Account.

12. If there are any lags or problems work through these additional Troubleshooting Steps for Windows 7. If needed start a new thread for expert help.

13. Consider a Clean Reinstall - Factory OEM Windows 7 which is often better than getting a new computer considering how pre-installed bloatware can corrupt Windows 7 even if it's completely cleaned up.

Friday, August 31, 2012

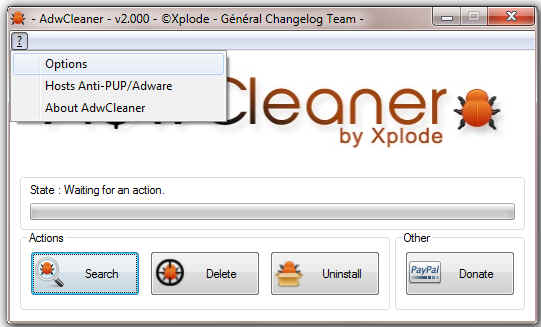
AdwCleaner

AdwCleaner is freeware by French developer, Xplode. As Donna indicated, it can detect and remove
  • Adware
  • PUP
  • Toolbars
  • Hijackers

AdwCleaner supports Internet Explorer, Mozilla Firefox, Google Chrome and Opera and works on Windows XP, Vista, 7 versions both 32 & 64 bit.

Changelog (In French): http://sd-1.archive-host.com/membres...AdwCleaner.txt
Elements Removed: http://sd-1.archive-host.com/membres...AdwCleaner.txt

It is important to note that everything that is found by AdwCleaner will be removed, with no options to "skip" any of the findings. Thus, for example, browser homepage settings will be reset, Firefox prefs.js will be removed.

Search:

Download AdwCleaner by Xplode to your Desktop.


  • Double-click AdwCleaner.exe to run the tool, approving the UAC prompt.
  • Click Search.
  • A logfile will automatically open after the scan has finished.
  • Please post the contents of that logfile with your next answer.
Note: The log can also be found at C:\AdwCleaner[XX].txt where XX denotes the number of times the application has been run, i.e., R1

Delete:

Download AdwCleaner by Xplode to your Desktop.


  • Double-click AdwCleaner.exe to run the tool, approving the UAC prompt.
  • Click Delete.
  • Everything that was found will be deleted.
  • Save and open files and approve the reboot.  A text file will open after the restart.


  • Please post the contents of that logfile with your next reply.
Note: The log can also be found at C:\AdwCleaner[XX].txt where XX denotes the number of times the application has been run, i.e., S1

AdwCleaner Help:


UNINSTALL

Please do the following to uninstall AdwCleaner.

  • Double-click on AdwCleaner.exe to run the tool.
  • Click on Uninstall
  • Confirm with yes